Portobello Mushroom and Asparagus Risotto

italyRisotto is a classic Italian dish that consists of short grain rice cooked in broth until rich and creamy. Each city/region in Italy uses different ingredients and flavors but the preparation of the rice is generally the same.

Short grain rices, such as Arborio rice, are ideal for making risotto because they are starchy and absorb lots of liquid which makes them get thick and creamy. Making risotto is a somewhat lengthily process because you have to add broth into the rice in small increments generally over 15-20 minutes, but the result is this wonderfully creamy thick texture that is decadent without using any heavy creams.

Generally risotto is cooked first in a pan with onion, then wine is added and once that has been absorbed, stock is added in small amounts while you are stirring consistently. From that basic recipe, you can add all sorts of flavors.

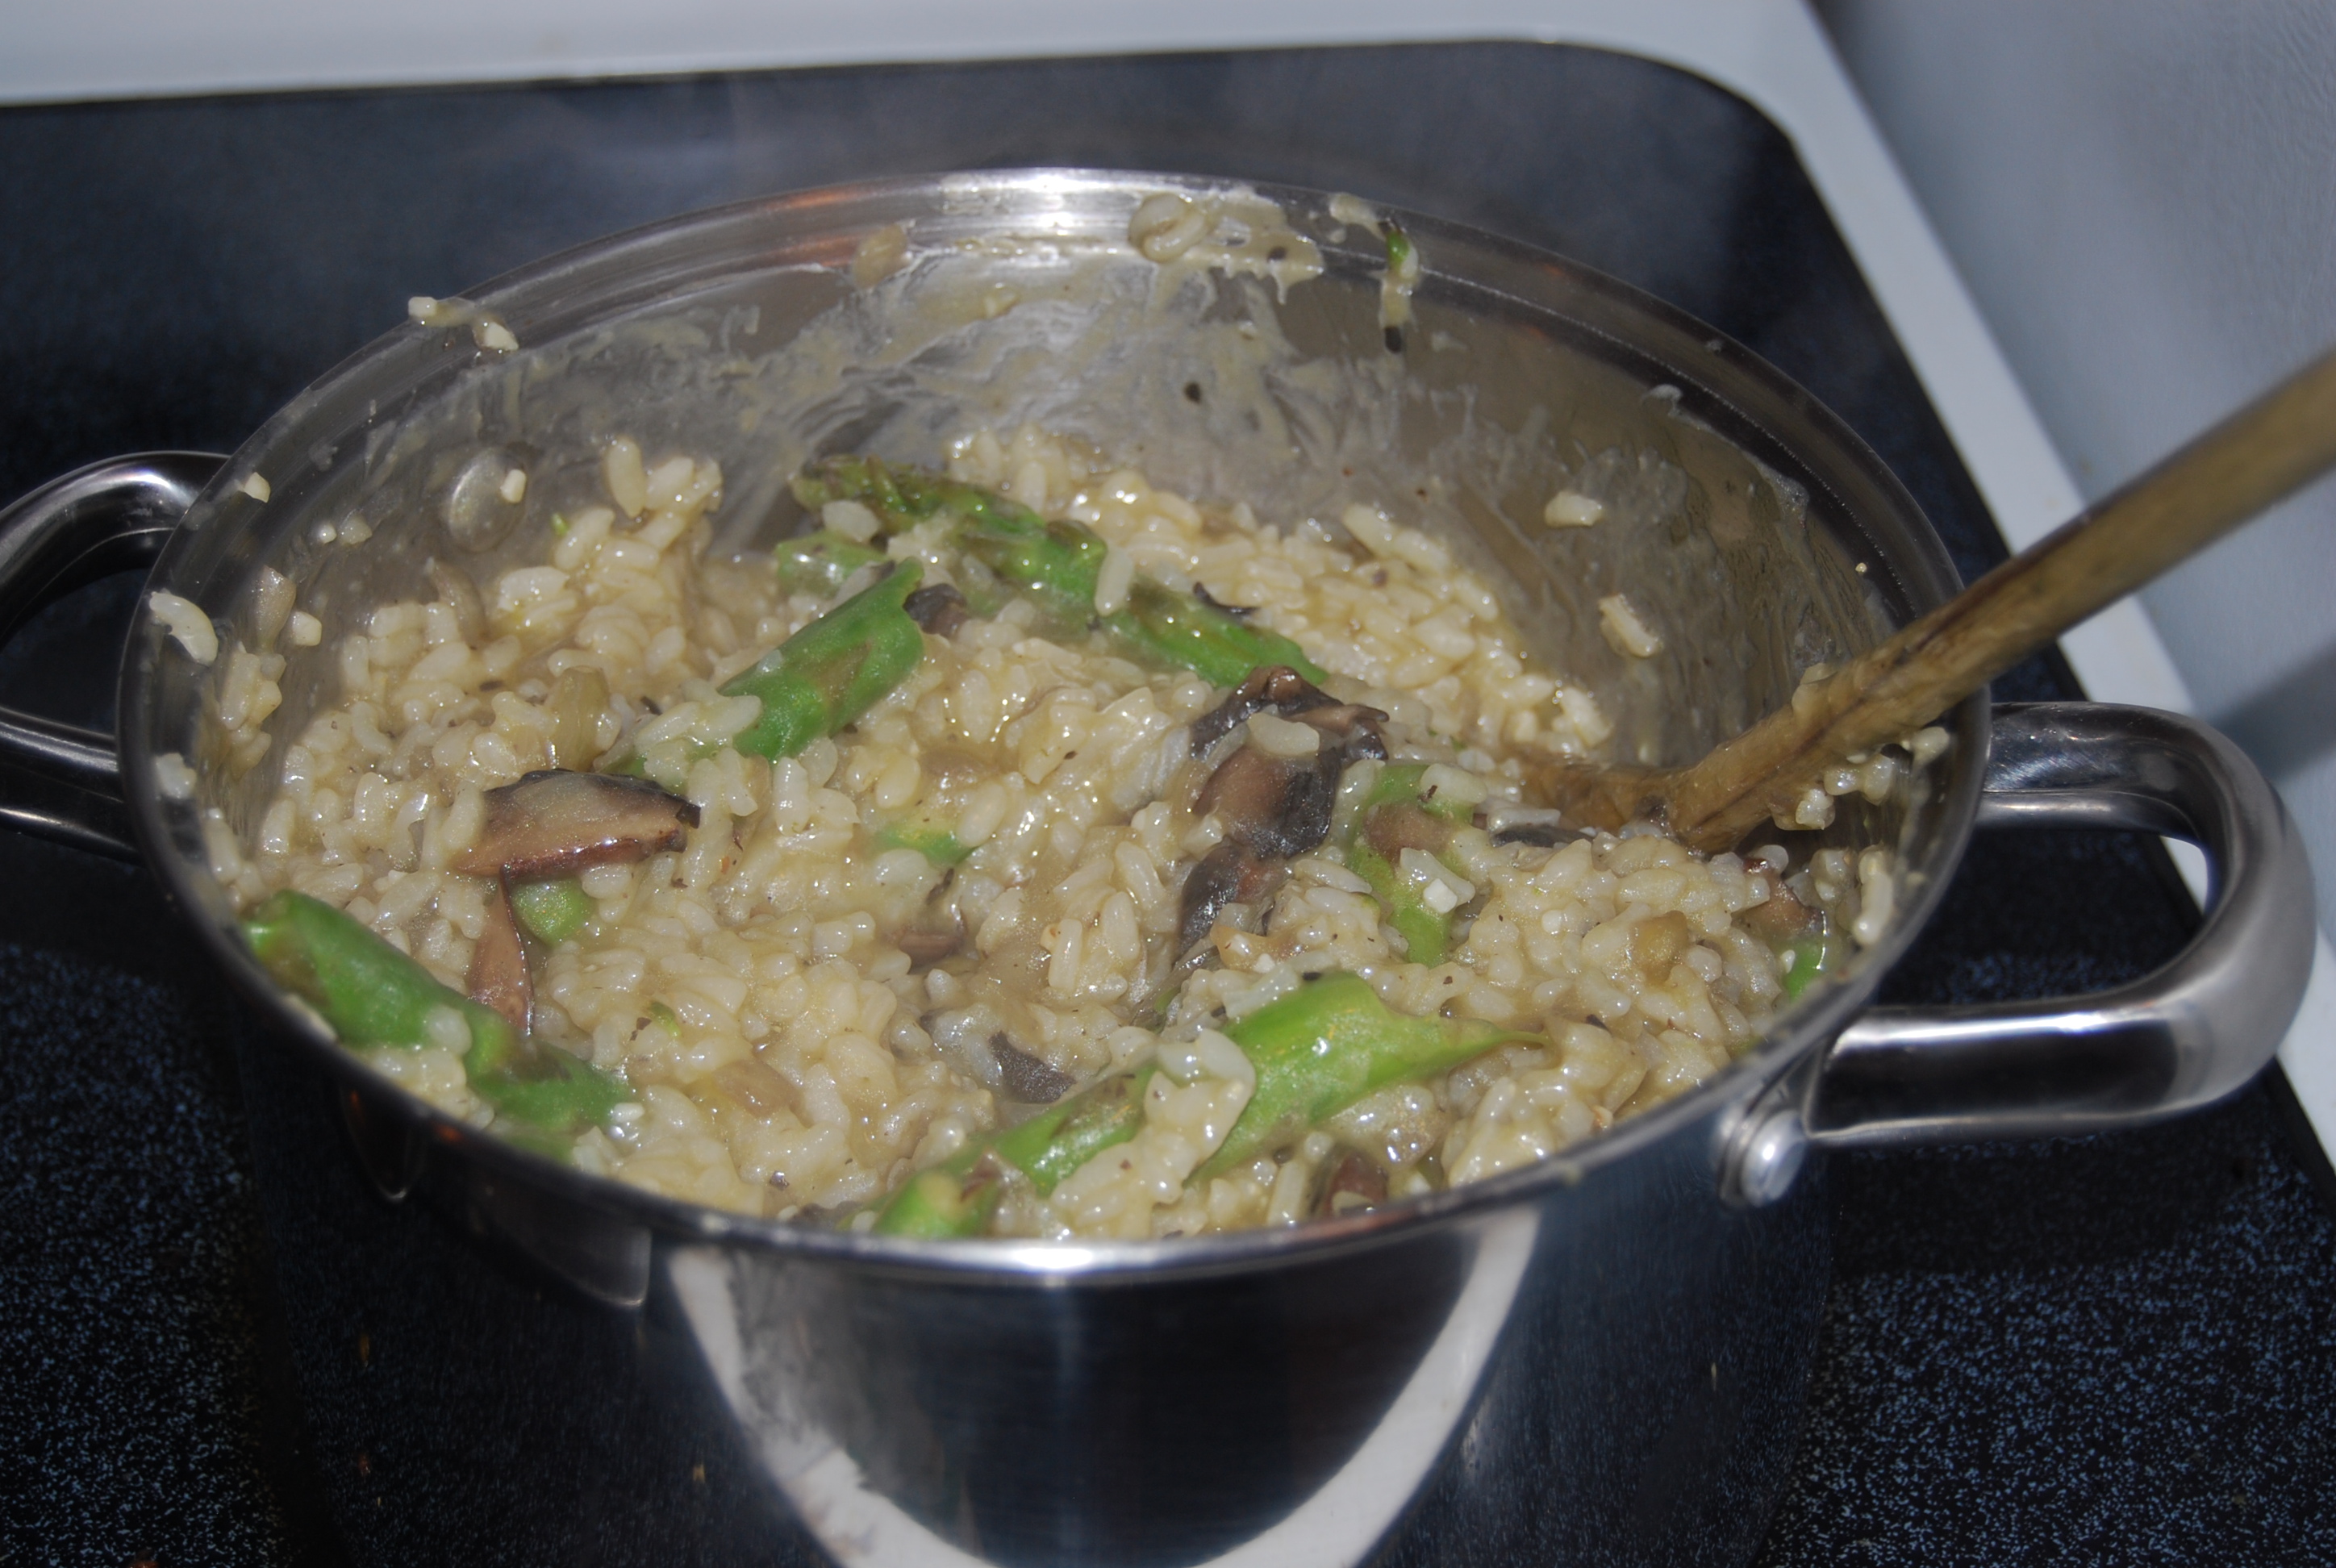
I decided to go with baby portobellos and asparagus this time since they are both in season this time of year. My mom loves to make this with mushrooms which is why this is also my favorite.

In italy, they serve risotto with beef broth and saffron in Milan and black risotto made with cuttlefish ink in Tuscany. These are just a few of the types of risottos. You can use both red and white wine. I can’t wait to try some different flavors in the future!

Ingredients:

  • 10 thinly sliced baby portobellos (or perhaps 2-3 thinly sliced mature portobellos)
  • 1 onion – diced
  • 10-15 asparagus stalks cut into 2 inch pieces
  • 3 tbsp. of olive oil
  • 1 box of Arborio rice (or any kind of starchy short grain rice you can get your hands on)
  • 1 bottle of white wine (I used Pinot Grigio)
  • 6 cups of vegetable broth (if vegan) or chicken broth
  • 2 tbsp. butter-spread (smart balance light)
  • salt, pepper, chili flakes and other dried spices to taste

In one large frying pan, saute the onions in about 1 tbsp of olive oil until glassy, then add the mushrooms. Cook for about 8 minutes until the mushrooms have cooked off a nice brown liquid. Add the asparagus (which does not take a long time to saute) and saute for a minute or 2 before turning off the heat. Let the mushrooms and asparagus cool on the burner.

DSC_0059

At the same time, you want to put the stock into a sauce pan and heat. In another, larger pot add about 2 tbsp of olive oil and the arborio rice. Cook the rice in the olive oil until they start to pale.

DSC_0062

Add in 1 cup of the white wine and stir until the wine is fully absorbed. Add 1/2 of a cup of stock to the rice and stir until the stock is fully absorbed. Add another cup of white wine and stir until the wine has been absorbed. Continue to add the stock, 1/2 cup at a time, until all of the stock is used  and absorbed and the rice is cooked al-dente. This should take about 15-20 minutes. You can add the remaining white wine in 1/2 cup increments if you desire, or you can just pour yourself a nice glass.

DSC_0067

The risotto should be thickening up nicely at this point. Remove the heat and add the mushroom, asparagus and onions to the pot with the saute liquid. You can also add margarine or butter, I used Smart Balance Light which is also vegan and cheese for the non vegans out there.  Salt, pepper and spice to taste!

DSC_0068

Serve as a main meal or a side dish. I threw together a quick olive, tomato and Spinich salad with feta to go with it.

DSC_0072

Do you have any special family Risotto recipes? Any memories of an Italian trip? 🙂

Moroccan Hirira Ren Lentil Soup (Vegan!)

So I haven’t really spent much time in Africa or the Middle East, except for a short stint in Egypt. This  was not a meal I ever had when I was travelling through Egypt though. This is just something that I used to have at this Mediterranean place by my work that had cheap soup for those lunch breaks when I forgot to bring a meal from home.

I re-discovered it recently when I was catching up with some old friends from high school at a Mediterranean place downtown. It’s a super delicious tomato and lentil soup that is just the right mix of heartiness and lightness, perfect for the change of seasons.

Research has told me that Hirira is quite a common soup as a starter in Morocco, but it also commonly used during the month of Ramadan to break fast. As with many national staples, recipes for Hirira often differ within communities. The recipe that I prefer is a little heartier than some of the lighter versions out there. I like to include chickpeas as well as red lentils. This means it is a super protein packed soup with a little spicy kick to heat up those rainy spring nights!

Ingredients:

  • 1 large white onion
  • 2 medium sized carrots
  • 2 celery stalks
  • A heafty handful of Kale, chopped
  • EVOO
  • 1/3 of a cup of parsley leaves and stems
  • 1/2 cup of cilantro leaves and stems
  • 2 tbsp. of minced garlic
  • 2 tbsp of minced ginger
  • 1 1/2 tsp of Turmeric
  • 1 tsp. Cumin
  • 1 tsp. cinnamon
  • 1 tbsp. of Hungarian paprika (at least, I usually put in 2 tbsp. because I love spice)
  • 1 tbsp. of dried chili flakes (optional)
  • 1 cup of dried red lentils
  • 1 can of chick peas
  • 1 can of crushed tomatoes (I used a can of tomato sauce and that was good too)
  • 1 box of vegetable stock (although for the recipe on the pictures I used chicken stalk, it was what I had in the fridge at the time, but use vegetable if you want it vegan).
  • Some chopped cilantro to garnish
  • Salt and Pepper to taste

DSC_0009

Coat a soup pot with a decent amount of Olive oil over medium heat. Add the onion, carrot, celery, kale, ginger, garlic and a little salt and pepper and saute until the onions start to brown. Now its time to add the spices; add the turmeric, cumin, paprika, cinnamon and chili flakes and saute for another couple of minutes. Heating the spices up is the best way to release their flavors.

DSC_0013

Add the red lentils and cook for a few minutes to let them soften. After, add the chick peas (with the canning juice), tomato sauce and vegetable broth. Bring the soup to a boil, then reduce to simmer and let cook semi-lidded for about 30 minutes.

DSC_0016

Add more broth or water if you want the soup to be more runny (I like it thick ;p)

DSC_0020

I heated up some naan bread as an accompaniment. Serve and sprinkle some cilantro on top!

DSC_0027

Traditionally I think they nix the naan and serve this with lemon, dates, philo dough and Aleppo chilies.

Enjoy!

Let me know what you think!

Raw Vegan Cheesecake

So for the past year  I’ve been following a series of YouTube videos called My Drunk Kitchen. It is every bit as delightful as it sounds. One of her episodes featured drunkenly creating raw vegan cheesecake. I am not in any way Vegan, I love chicken and cheese way too much to ever give them up for more the 4 months at a time. However, I do believe in sustainable eating and experimentation so I have developed a fondness for vegan baking. While there is no actual baking involved in raw vegan cheesecake, I still put it under the category of baked goods.

Here is a link to My Drunk Kitchen. I encourage you all to check it out because Hannah Hart is fucking hillarious and I want her to be my BFF.

So this recipe definitely requires a food processor or (in my case) a high powered blender. The better the blender the creamier the cheesecake will turn out.

Ingredients:

For the crust:

  • 2/3 cups of walnuts
  • 2/3 cups of dates
  • 1/2 cup of unsweeted shredded coconut (I omitted this this time because the guy is really allergic to coconut)
  • 1/2 tsp sea salt or kosher salt

For the filling:

  • 2 cup of raw cashews that have been soaked in water for at least 4 hours (soaking them overnight is best)
  • 1/2 cup of organic raw coconut oil that has been melted
  • 1/2 cup of agave nectar (or honey if you have that instead)
  • 1 tbsp of vanilla extract (or vanilla bean if you have it, which, since i’m poor, I did not)
  • Juice of two lemons
  • 1 cup of strawberries, or any berries you choose to use!
  • Hand full of assorted berries to garnish

Okay, so first thing we have to make the crust. You can do this in any pie dish.

Combine the walnuts, dates salt and coconut in a food processor and blend until you can mold the mixture. Place the mixture in the pie pan and put in the freezer to chill while you make the filling.

In a large food processor or blender, blend the soaked cashews, coconut oil, vanilla, agave and lemon together until the mixture is smooth. I used a blender and this took a decent amount of time to get all the mixture smooth enough.

For this recipe I poured half of the cashew filling into the pie pan and then blended the remainder with the strawberries. If you are using frozen strawberries, you should thaw them first before you try to blend them on high with the cashew mixture. Its up to you how blended you want them, you can blend it smooth or leave chunky bits of strawberry, you can’t really go wrong. Pour the berry mixture onto the other mixture and smooth with a spatula.

Store this in the freezer until the mixture gets pretty solid, I would say at least an hour. Take the cheesecake out of the freezer 30 mins before you want to serve it. You can either keep the leftovers in the freezer or store in the fridge if you don’t mind the texture being a little softer. Throw some berries on top and enjoy!

I was surprised at how rich and creamy this turned out, being made mostly from nuts. The lemon adds the perfect tang to the mix, mimicking actual cheesecake perfectly. After making this a few times it has become a family favorite and I don’t think I’ll go back to “normal” non vegan cheesecake.

I think next I’m going to experiment with chocolate vegan cheesecake or orange flavored cheesecake. The possibilities are endless!

This post it even making me hungry. I have one last slice of cheesecake left. I think I’ll go enjoy it!

Kartoffelsalat (German Potato Salad)

I’m pretty sure Kartoffelsalat is my favorite part of a German meal. People need to take it away from me before I eat the whole thing. In Germany there are typically two different types of potato salad. In the north they make it with mayonnaise (which is also how its done in the US) but in the southern parts of Germany and Austria, potato salad is make with vinegar and mustard. Since my Oma is Bavarian, we were brought up eating potato salad with a mustard base and I never really took a liking to the mayonnaise loaded potato salads you often see at american BBQ’s. Trust me once you have potato salad made in the southern German way you wont go back.

Kartoffelsalat is a typical side dish to most sausages, in my family its mainly Wiener Würst. It is almost always served at the beer gardens in Bavaria. This recipe is the way that my grandmother usually makes it, except I sometimes like to throw in some bacon pieces. Normally we don’t have it with bacon and its delicious either way.

Ingredients:

  • About 12 medium sized Yukon gold potatoes, boiled and peeled
  • 5 bacon strips (optional) fried and cut into small pieces
  • 1 white onion diced
  • 2 green onions diced or 2 tbsp of chives
  • 1/3 cup olive oil
  • 1/4 cup red wine vinegar
  • 2 tbsp Dijon or brown mustard
  • 1 tbsp sugar
  • salt and pepper to taste

Take the boiled and peeled potatoes and cut them into bite sized pieces. Combine the potatoes with the bacon, onion and sliced green onions.

Add in all of the wet ingredients and the sugar and mix together well!

Add more vinegar, oil or mustard to taste. I usually like it pretty mustard and vinegary so I tend to go heavy on that.

This dish can be served cold or warm, we normally have it kind of lukewarm.

Enjoy!

Thai Green Papaya Salad (Som Tam)

Thai green papaya salad is one of those appetizers that really has everything you are looking for. The sweet tart of the papaya with the saltiness of the fish sauce and the fiery after-burn of the chilies pack so much flavor into such a simple meal.

I’ve been to Thailand quite a few times, and I eat at Thai food places as often as I can afford here in the PNW. This is one Thai meal that I can reproduce well enough to make frequently (I still haven’t mastered the green curry so If anyone has any great pointers let me know!). This is usually served as a side or an appetizer but I love it so much I can eat a whole bowlful as my meal. Make sure you are grabbing a green (as in not ripe or somewhat sour tasting) papaya and not a rip one (which is usually an orange color). Ripe papaya should have a greenish orange skin and the best place to usually get them is at an asian market.

Ingredients:

  • One medium green papaya, shredded
  • 1 cup of chopped roasted peanuts
  • 2 tomatoes diced
  • 1 cup blanched green beans cut into 2 inch strips
  • 3 green onion pieces diced
  • 4 cloves of garlic
  • 1/2 cup of fresh basil leaves, roughly chopped
  • 1 red chili diced (remove the seeds if you are not so into spicy food)
  • 1 tsp shrimp paste (or substitute for 1 tsp fish sauce or soy sauce if unavailable)
  • 2 tbsp olive oil
  • 2 tbsp fish sauce
  • 2 tbsp rice wine vinegar
  • 2 limes
  • 1/2 tbsp agave (or honey)

Alrighty, so firstly if you have a mortar and pestle bust that baby out and prepare yourself for some serious arm action. Put the garlic cloves and chili into the mortal and crush into they look pretty mushed. Add the shrimp paste (I used dried shrimps in this example which I found at the local asian super market.)

Grind those up until they are pastey. Squeeze the juice of the limes, oil, vinegar, fish sauce and agave in and add the blanched green beans and grind some more until it is well mixed. In a separate bowl add the shredded papaya, peanuts, tomatoes green onions and basil. Combine the wet ingredients with the papaya and stir until well mixed. Add more oil, vinegar, fish sauce or dried chilies if desired.

If you don’t have a mortal and pestle just mince all the ingredients finely and add them together, I guarantee it will still taste delicious. Serve yourself a bowl of this delicious salad and enjoy!

Let me know if anything was unclear! Thinking about this salad is making me super hungry and I can’t think properly.

Yummy Yummy Kale Chips

Many of my foodie friends have been raving about Kale chips, so I decided to try them myself. I’ve never really been a big chips fan. I usually just eat plain corn chips with salsa. However, one can never have too many healthy snack ideas.

Kale is also the best thing ever.

So one batch of Kale from the super market will probably get you a few cookie sheets full of delicious kale chips.

All you have to do is tear pieces of the kale leaf from the stem, dry them and place them on a baking sheet.

Drizzle the kale with olive oil and add kosher salt (and any other flavoring you want).

This time I added Chipotle chili power to the chips for a little zing.

Pre-heat the oven to 350 degrees F.

Bake them for about 15 mins or until crisp. I like to flip them over to make them extra crunchy, but thats a matter of preference. I also like crunchy cheetos over puffy ones.

They Should look something like this!

Let the guilt free om nom nom-ing commence!

Swiss Fondue!

My Dad loved to travel before he settled down and started a family (and he still loves to travel btw, we all do).

One of his favorite places to go was Zermatt, Switzerland. Its a rather small touristy town now-a-days but it is also close to the Matterhorn, a rather scary looking mountain my father has climbed more then once.

During his travels he developed a fondness for Swiss fondue and over the years developed his perfect recipe. I grew up eating this Swiss fondue and I think it is the best fondue recipe I have ever had (probably because it involves a decent amount of booze).

My family, being fondue lovers, own a fondue pot and this recipe is best cooked with a fondue pot. Don’t fret! if you don’t own one take a trip to the local thrift store or search on craigslist. People are always giving away fondue pots. The pots themselves vary in price but you can get a decent one for around 25 bucks. The one we use is probably from the 80’s but still going strong.

What you will need:

  • 1 and a half pounds of shredded swiss cheese – a little over 1/2 pound Emmentaler and a little over a 1/2 pound Gruyère. However, this can get pr
    etty expensive and since I am on a post-grad budget, for this recipe I used 1 pound of Jarlsberg which is similar to Emmentaler and a 1/2 pound of sliced swiss cheese. This makes the cheese around 7 bucks rather then 20!
  • 1 tsp Corn starch
  • 1 clove of garlic
  • 1 1/2 cups of dry white wine
  • salt, pepper and nutmeg to taste
  • 3 tbl Kirsh (cherry brandy), triple sec or Cointreau – we normally use a cherry brandy but we try to find a brandy that is less on the sweet side. triple sec will do in a pinch but nothing beats the flavor of the cherry brandy!
  • One loaf of Artisan bread cut into cubes
Okay, heat up your fondue pot (or any cooking pot you prefer) and once it is warm rub the pot with a clove of garlic. I feel that this really infuses the pot with a little bit of garlic flavor, and I absolutely love garlic.
Drop the garlic glove in and pour in your white wine. If you are using a fondue pot set it to the lowest heat, likewise with a pot on the stove. When the wine is heated to the point where the air bubbles start to rise to the surface (it must not boil), you can start adding in the shredded cheese.
Stir constantly with a fork or spoon and add in the cheese by the handful, pausing until each handful has dissolved completely before adding another.
Now take the corn starch and dissolve it in the Cherry Brandy (make sure you get all of the clumps out). Add this to the cheese mixture and stir for 2-3 minutes or until the mixture starts to bubble lightly.
Add in the salt, pepper and nutmeg to taste (we use about a quarter teaspoon of freshly grated nutmeg or about a half a teaspoon of ground nutmeg).
Keep the fondue on low heat until you are ready to serve. Now, slice up your preferred artisan bread into bite size cubes.
In the true Rinker fashion we eat our fondue on the floor and watch a good movie.
The cheese should be of a thick consistency but it should be thin enough to attach itself on the bread easily. If the cheese gets to thick or thin just adjust the heat accordingly. If cooking fondue on a pot on the stove you may have to take pauses in between eating to allow your cheese to melt back to the appropriate consistency.
Dip and Enjoy!
Let me know what you guys think?
Anyone have any family fondue secrets?